Goals
- Know the three stages of empyema and their recognition (Early Serous, Fibrinopurulent, and Late Organizing).
- Know the intercostal and the rib removal techniques for entering the chest cavity.
- Demonstrate removal of the parietal (chest wall) empyema peel.
- Demonstrate removal of the visceral (lung) empyema peel.
- Know the anatomic structures at risk during decortication (subclavian artery, intercostal arteries, thoracic aorta, phrenic nerve, esophagus, and diaphragm) and the techniques used to avoid them.
Equipment
- Chest mannequin.
- Oil-based non-hardening clay—Plastalina by Van Aken International, Rancho Cucamonga, CA 01729.
- Polyethylene tubing—3/4-inch x 18-inch (thoracic aorta simulation).
- Polyethylene tubing—1-inch x 12-inch (thoracic spine simulation).
- Thirteen 1-inch bolts with nuts for attaching tubing to the mannequin and football half to mannequin.
- One 12-inch long rubber American football.
- One 10-inch long Styrofoam American football.
- One set of 10 disposal Size 10 scalpels—Dynarex Corporation, Orangeburg, NY 10962.
- One forceps.
- Two curved hemostats.
- One long Kelly clamp.
- Kittner dissector sponges —AMD—Ritmed Inc.—295 Firetower Drive, Tonawanda, NY 14150.
- One pair long Mayo scissors.
- Microfoam 4-inch surgical tape—3M Healthcare—Vitality Medical, Salt Lake City, UT 84121.
- Drill set.
- Roll of 2-inch clear plastic packaging tape.
Preparation Chest Wall Decortication
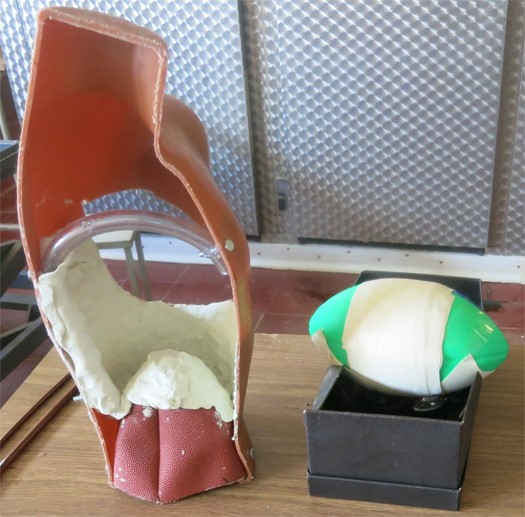
Preparation of the Chest Wall Decortication Model:
- Saw the chest mannequin in half along its sagittal plane.
- Cut an opening 5-inch x 8-inch on the lateral side of each mannequin half to simulate a thoracotomy incision.
- Cut the rubber football in half along its short axis to simulate the diaphragm.
- Drill three holes in the inferior portion of the mannequin to secure the football half with bolts. The point of the football is pointed cephalad.
- Drill three holes in 3⁄4-inch tubing and the mannequin and attach to inside of left-sided chest mannequin to simulate the thoracic aorta.
- Drill three holes in 1-inch tubing and mannequin and attach to the inside of the right-sided mannequin to simulate the thoracic spine.
- Use 1⁄2-inch thick layer of Plastalina clay to line inside of left chest mannequin and “diaphragm” to simulate parietal thickening in third stage (organized) empyema. Begin at the level of the aortic arch and continue inferiorly to the end of the mannequin anteriorly and posteriorly. Cover the entire “pleural” surface of the football (the “diaphragm”).
Preparation Lung Decortication
Preparation of the Lung Decortication Model:
- Wrap one layer of clear plastic tape around the football at the site of intended Microfoam tape wrapping.
- Wrap three layers of Microfoam tape around styrofoam football on top of the plastic tape to simulate the hyalinized pleural thickening in third stage (organized) empyema. Decrease wrap to one layer towards one end of the football to simulate thinner apical peel over the lung.

Image 9-1: Completed Models for Chest Wall and Lung Decortication
Initial Preparation for Decortication
Initial Preparation for Decortication
Note: Often in the setting of a late stage empyema, the volume of the lung will be reduced. This will cause the ribs to lie closer together and the diaphragm to lie much higher than usual. Removing a rib using the subperiosteal technique, described in the video from Exercise #8, will often allow room to begin the chest wall decortication by initial blunt finger dissection of the thickened parietal pleura off of the inside of the ribs.
• Often finger dissection of the thickened chest wall pleura in a direction toward the apex of the chest cavity will demonstrate a thinner area of pleural thickening. One can then easily develop a plane between the lung pleura and the thickened tissue resulting from the empyema process. This plane can be extended inferiorly to initiate the lung decortication.
• This will enhance the surgeon’s ability to know how deep to incise the thickened pleura in order to orient himself or herself to the location of the underlying compressed lung, the actual empyema cavity (if present) and the location of the elevated diaphragm – three critical steps in performing a decortication.
• Please note that the two exercises of chest wall and lung decortication are described as sequential events. In actual practice, the operation often requires moving back and forth between chest wall and lung decortication to achieve the best result.
Discussion: Chest Wall Decortication
Chest Wall Decortication
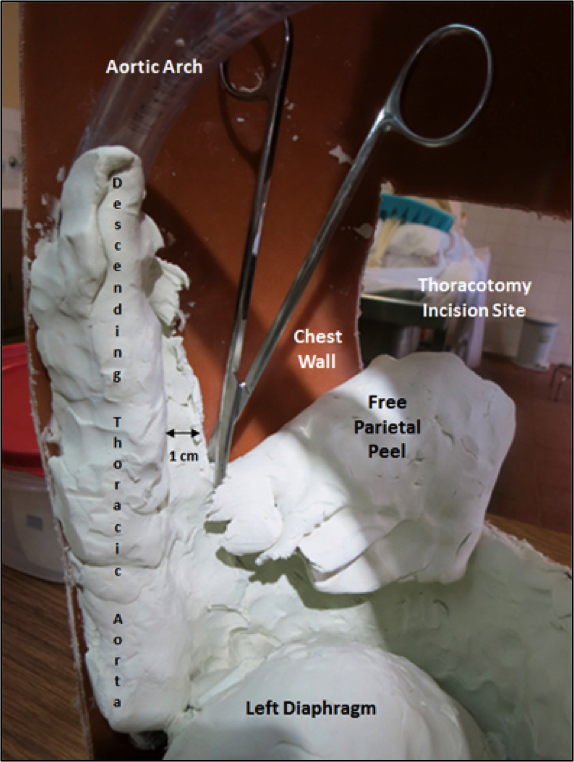
1. Begin the chest wall decortication by blunt finger elevation of the layer of clay (the simulated layer of hyalinized thickened pleura) along the inferior border of the thoracotomy incision in the mannequin.
2. Continue medially towards the simulated descending thoracic aorta (see below). Discuss the importance of ending this dissection one centimeter lateral to the aorta in order to avoid injury to the intercostal arteries as they originate from the aorta.

Figure 9-2: Chest Wall Decortication
3. Using heavy scissors, divide the “pleural peel” in a vertical fashion one centimeter lateral to the aorta and continue inferiorly down to the level of the inferior margins of the diaphragm anteriorly and posteriorly.
4. Discuss the importance of avoiding decortication of the apical pleura and the mediastinal pleura. Decorticating these surfaces does not contribute to any trapped lung expansion and risks injury to the subclavian vessels, the major pulmonary vessels at the hilar area, the esophagus and the phrenic and vagus nerves.
5. Carefully dissect through the thickened “pleura” over the apex of the diaphragm in order to identify the diaphragm and develop a safe plane of dissection without perforation of the diaphragm.
6. Once this plane has been developed over the apex of the diaphragm, continue the decortication posteriorly and anteriorly until the entire diaphragmatic surface has been decorticated. Remove the thickened pleura that has been dissected free from the chest wall and diaphragm.
Discussion: Lung Decortication
Lung Decortication
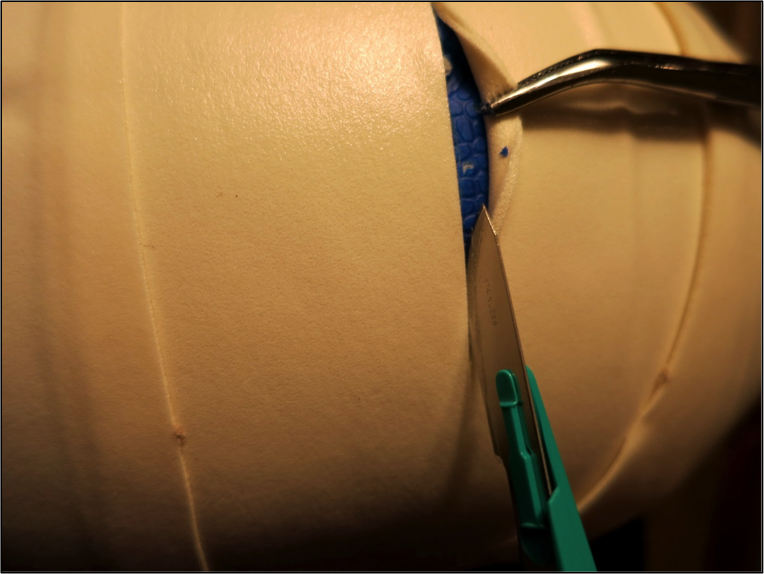
1. Using Microfoam-tape covered styrofoam American football, incise the “visceral” pleural peel with the “belly” of the scalpel with shallow cuts.
2. Spread the pleural edges with a curved hemostat after each deepening incision to attempt recognition of the “pleural surface” of the lung (football) before cutting into it (see below).

Figure 9-3: Lung Decortication
3. Grasp edges of incised pleura with hemostats to assist the development of a plane just proximal to the underlying “pleura”( the layer of clear plastic tape). While assistant holds the hemostats, use Kittner dissectors to advance the plane of dissection. Also use scalpel edge to advance the edge of dissection.
4. Cut off pleural peel that has been freed up from the lung surface.
5. Deliberately incise the “pleural layer (plastic tape) into the underlying Nerf foam for a length of one centimeter and then demonstrate the strategy of avoiding further decortication in that area. Instead, decorticate the pleura in areas away from the pleural cut and thereby encircling the area of pleural entry. Only after completing the decortication circumferentially around the “pleural entry” does one complete the decortication directly over the pleural entry site. This maneuver avoids further damage to the underlying “lung” parenchyma that would happen if one continued decortication at the site of the entered lung tissue – thus worsening the damage to the underlying lung tissue.