Goals
- Demonstrate patient stability in the lateral position.
- Demonstrate proper padding and positioning to prevent pressure and stretch injuries to
nerves, skin and muscles and shoulder joint dislocation. - Discuss how to maximize left thoracic cage rib separation with table flexion.
- Reliably identify the correct intercostal space for the incision.
Equipment
- Full body skeleton—3B Scientific Company.
- Flat table or— preferably—an Operating Room table with attachable padded flat arm board and a flexible upper arm support.
- 5 pillows.
- 3 sheets (2 for covering pillows and table, 1 as draw sheet for lifting thorax).
- One 4.5 inch x 3 yard Kerlix gauze bandage roll cut in 1 1/2 yard lengths to encircle blanket rolls that stabilize thorax in the lateral position.
- One roll of 3-inch adhesive tape to adhere calf area foam padding to OR table and to adhere iliac crest folded blanket to OR table.
- Four foam rubber pads—12 inch x 4 inch— for padding calf, upper and lower arms.
- One rubber water bottle or plastic saline bag wrapped with a pillow case to create an axillary roll. The use of an axillary roll is not necessary if the anterior and posterior blanket rolls are positioned snugly against the patient’s chest so that they elevate the chest cage with the right shoulder lightly touching the Operating Room table.
- 6 pillow cases (5 for pillows and 1 for axillary roll).
- 3 OR blankets (2 to make 15 inch long rolls secured with adhesive tape for thorax
stabilization and 1 to fold lengthwise and tape for anterior hip padding and stabilization). - Head rest pillow or a folded blanket to maintain the cervical spine horizontal to the Operating Room table.
- Cautery grounding pad.
Preparation
- Lay the full body skeleton on a flat surface or preferably an operating room table.
Discussion
Patient Positioning for Thoracotomy
1. If using an Operating Room table, remove the head piece and insert at the foot of the table.
2. Tuck in two sheets to cover the table.
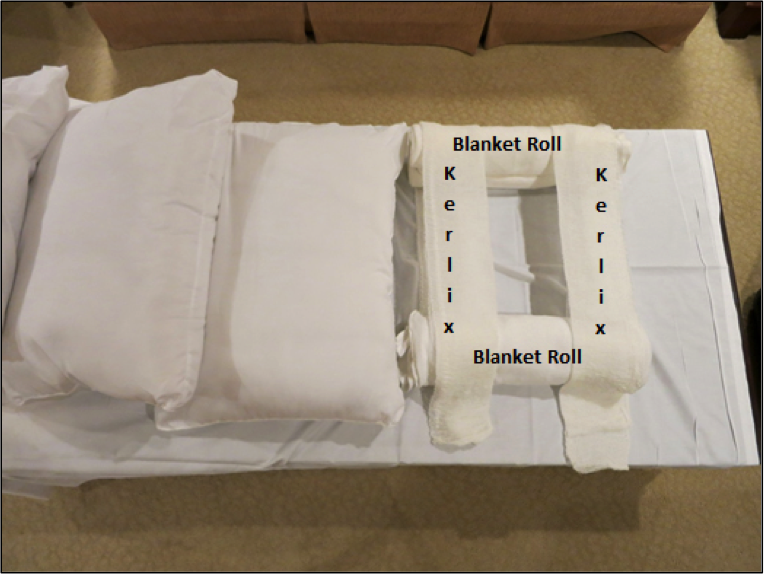
3. Place two folded strips of Kerlix across the table just above the “break” with the “open” end of Kerlix facing the future side of the skeleton’s spine. Place “draw sheet” (a sheet folded in half) over the upper half of the table on top of the two Kerlix strips. This will keep the Kerlix from “burning” the patient’s skin when the Kerlix is tightened around the blanket rolls. Fold 2 sheets into two rolls 2 feet long and encircle with 1 inch adhesive tape to form blanket rolls (see below).

Figure 7-1: Patient Positioning
4. Insert one blanket roll within Kerlix loop at folded end of Kerlix and one blanket roll within the “open” end of the Kerlix.
5. Position the skeleton in the supine position with the tip of the xiphoid process over the “break” in the table.
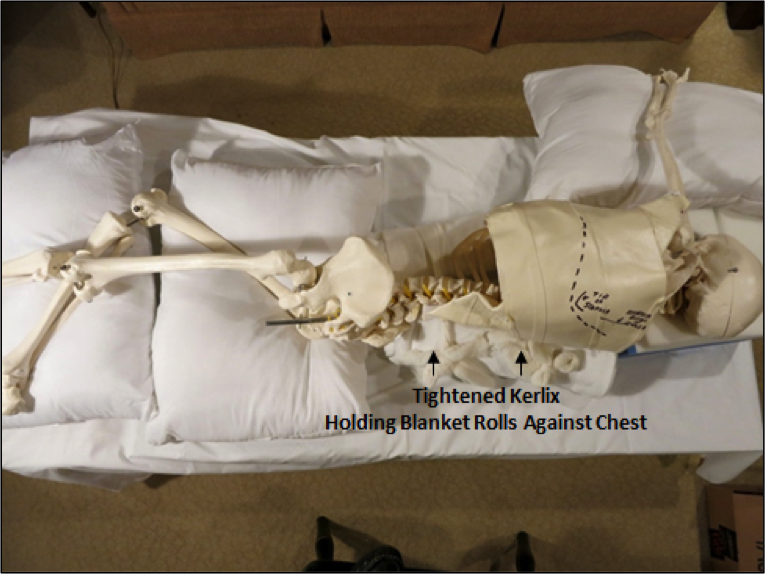
6. Place two pillows covered with pillow cases side-by-side under the feet, knees and hips of the skeleton. Cover with a sheet and tuck in to hold pillows in place (see below).

Figure 7-2: Lateral Thoracotomy Position
7. Place two pillows covered by pillow cases side-by-side between legs.
8. Attach padded flat arm board into right side of the table perpendicular to the right shoulder.
9) Attach padded flexible upper arm support to OR table. Lift skeleton with an assistant using the “draw” sheet and turn on its side facing to the right with right (lower) arm supported on the flat arm board and the left (upper) arm supported on the flexible upper arm board.
10. Pull the two Kerlix ends towards the skeleton’s spine and push the two blanket rolls snugly up against the sternum and the thoracic spine. Tighten the two open ends of Kerlix with a bow to hold in place.
11. Create an “axillary roll” with an IV bag or water-filled rubber water bottle wrapped with a towel (or Chux pad) and secured in place with adhesive tape. If an axillary roll is chosen, ask the anesthetist or anesthesiologist to “flex” the table, then – while an assistant lifts the skeleton’s chest cage with their hands in the axilla – insert the axillary roll just inferior to the assistant’s hands so that the roll lies just below the axilla. Do not place the roll directly in the axilla as this will create pressure in the axillary plexus.
12. Optional alternative to placement of an axillary roll. Tighten the two Kerlix strips against the anterior and posterior surfaces of the rib cage so that the patient’s chest cage is slightly elevated off of the surface of the OR table. This will reduce the pressure on the right shoulder and axilla and thus do without the need for an axillary “roll”. Then ask the anesthesiologist or anesthetist to “flex” the table.
13. Place a foam pad under the head to keep the cervical spine parallel to the OR table and not flexed.
14. Reposition the two pillows between the legs with right “down” leg flexed at the hip and knee. The knee should be resting just at the right edge of the table. The foot should be just at the left edge of the table. The “upper” left leg is positioned straight.
15. Place a foam cushion from the left calf to just below the knee and tape with three inch tape to the table to keep left leg from falling off the table. Make sure you can insert your hand easily between the foam cushion and the patient’s calf to avoid pressure injury to the calf.
16. Place grounding cautery pad on skeleton’s “thigh.”
17. Place foam padding under the skeleton’s right elbow lying on the flat arm board that has been placed perpendicular to the body.
18. Secure the upper arm in the flexible arm support at a right angle to the body. If the arm is positioned at a greater angle towards the head it will stretch the nerves in the brachial plexus.
19. Place foam padding under the entire left forearm on the arm board with the left elbow just proximal to the arm support.
20. Strap both arms in place with tape around the arm boards.
21. Place a folded blanket across the left hip at the top of the iliac crest and tape with three- inch tape to the table.
Note: It is suggested to perform the next steps after Lesson #8: Performance of a Left Postero-Lateral Thoracotomy.
Repositioning the Patient in a Supine Position after the Lateral Thoracotomy
1. Untape the upper and lower arms from the arm boards to allow the arms to move when “unbreaking” (leveling) the OR table. If they are not released, the change in position when the table is flattened may dislocate a shoulder.
2. Ask anesthesiologist or anesthetist to flatten (unflex) the table.
3. Remove the two pillows from between the legs and remove the blanket across the skeleton’s hip.
4. Remove the axillary roll while an assistant lifts the chest cage with the draw sheet.
5. Untie the Kerlix and remove the blanket rolls from within the Kerlix.
6. Tuck both arms alongside the skeleton and, using the “draw” sheet with an assistant’s help, turn the skeleton into the supine position.