Goals
- Demonstrate palpation of the inferior tip of the scapula.
- Demonstrate the site of skin incision.
- Describe the origin and insertion of the Latissimus Dorsi muscle and the intended line of division.
- Describe the origin and insertion of the Serratus Anterior muscle and the intended line of muscle division or inferior fascial attachment to the chest wall to allow retraction antero-superiorly.
- Demonstrate the subscapular identification of the first rib and subsequent counting down to desired intercostal space. Fifth interspace for most operations. Seventh interspace for distal esophagus and diaphragm exposure.
- Demonstrate the placement of rib retractor.
- Demonstrate the intercostal incision to enter the chest cavity and describe the location of the intercostal neurovascular bundle.
- Demonstrate subperiosteal rib resection and removal to enter chest cavity. Discuss indications.
- Discuss chest tube placement and option of intercostal nerve blocks.
- Demonstrate rib approximation and discuss closure of incision.
- Discuss the indications for single lung ventilation and techniques for lung retraction during surgery.
Equipment
- Full body skeleton—3B Scientific Company.
- Spool of 22 gauge steel wire.
- Wire cutter.
- Microfoam 4-inch surgical tape—3M HealthCare—Sold by Vitality Medical, Salt Lake City, UT.
- Fine point black Sharpie felt pen to label anatomy.
- 3⁄4 inch x 5 feet Velcro strips—Velcro Sticky Back, www.velcro.com.
- Gorilla Super Glue—The Gorilla Glue Company, Cincinnati, OH.
- Medium size right angle retractor.
- Rib spreader.
- Periosteal elevator.
- Rib cutter.
- Pigtail periosteal elevator (optional).
- Rib approximator.
- Sheet of small size bubble wrap.
- #1 Ethibond suture on a large needle.
- Needle holder.
- Suture scissors.
- Disposable scalpels with size 10 blades—Medi— Cut Sterile Disposable Scalpels with Safety Guard—Dynarex Corporation, Orangeburg, NY 10962.
- Chest tube.
- Kelly clamp.
- 0-silk suture on a curved needle.
- 1⁄4 inch Vaseline gauze strips.
- 3-inch adhesive tape for chest tube attachment to chest wall.
- Waterseal drainage set.
- Plastic Y-connector for connecting two chest tubes to one waterseal drainage set.
Preparation
- Skeleton modifications: remove bolt holding left scapula in place. Cut off metal crossbar supporting left scapula at the vertebral body level. Cut the wire holding the 5th and 6th ribs together and replace with 22 gauge wire to hold the two ribs together for each exercise.
- Create Left Latissimus Dorsi and Left Serratus Anterior muscle simulations with sandwiches made of Microfoam tape on the outside and small bubble wrap on the inside. Glue Velcro strips to muscle and bone origins and insertions.
- Create left chest skin simulation with two layers of Microfoam tape stuck together. Glue Velcro strip to “skin” edges and anterior and posterior skeleton bony attachments.
- Apply one layer of Microfoam tape to anterior segment of 6th rib for rib resection exercise.
Apply one layer of 4- inch Microfoam tape to the anterolateral rib cage between the sixth and ninth ribs for use in chest tube insertion demonstration.
Discussion Surgery Steps
Performance of Left Postero-Lateral Thoracotomy and Chest Tube Insertion
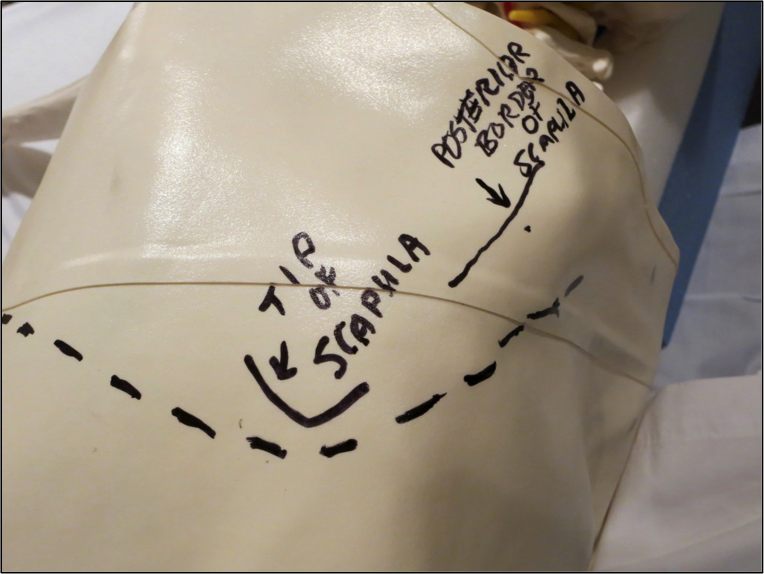
1. Review the following left chest anatomic landmarks: nipple, inferior tip of scapula, posterior border of scapula, spinous processes of thoracic vertebrae (see below).

Figure 8-1: Left Chest Wall Landmarks
2. Outline incision.
3. Remove skin simulation by detaching from anterior Velcro strip. Keep attached to posterior Velcro strip.
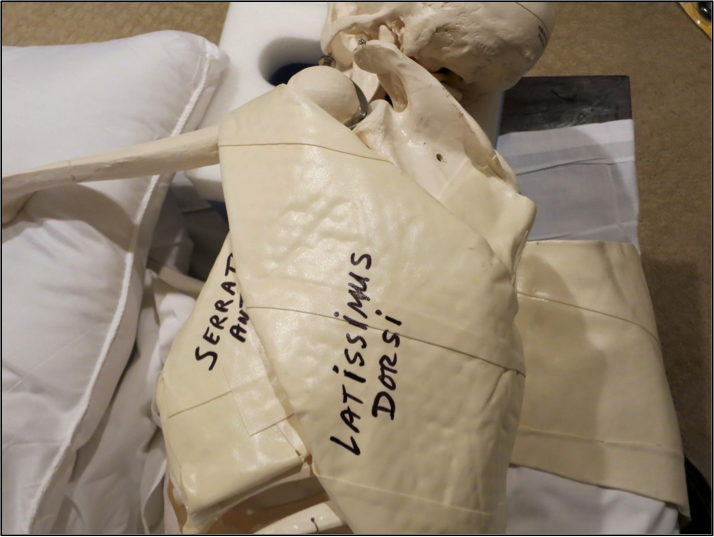
4. Demonstrate origin and insertion of Latissimus Dorsi muscle (see below). Outline intended site of division. Remove from Velcro attachment to proximal humerus. Leave attached to posterior rib cage.

Figure 8-2: Latissimus Dorsi and Serratus Anterior Muscles
5. Demonstrate origin and insertion of Serratus Anterior muscle (see below).
6. Demonstrate site of fascial release from chest wall to permit antero-superior retraction of Serratus Anterior muscle.
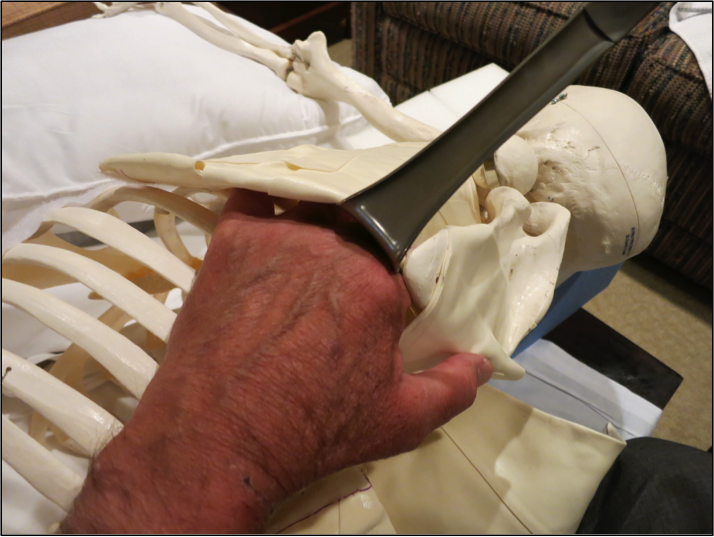
7. Demonstrate subscapular identification of 1st rib and the technique of rib counting to 5th and 7th interspaces (see below).

Figure 8-3: Subscapular Palpation of 1st Rib
8. Release anterior Velcro attachment of Serratus Anterior to allow visualization of the 5th intercostal space.
9. Describe technique of intercostal space entry into the pleural cavity. Discuss the importance of communication at this step with the anesthesiologist or anesthetist. Describe the technique of Chest cavity entrance by rib resection using the Microfoam covered 9th rib.
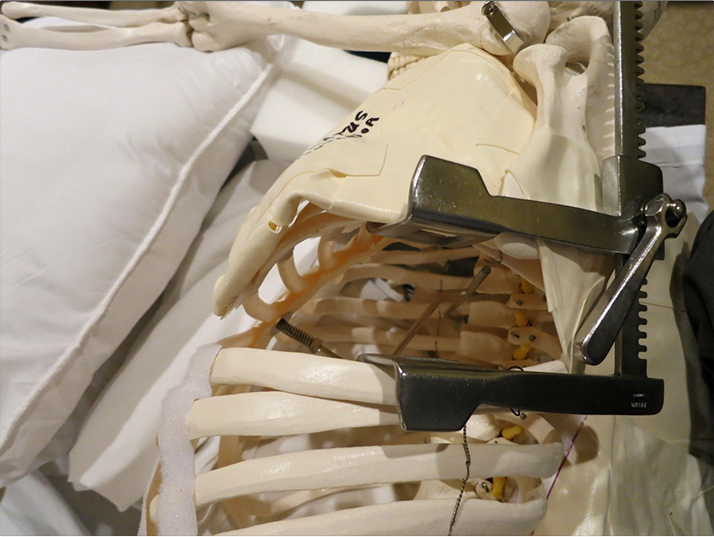
10. Demonstrate the placement of rib retractor over gauze pads and reasons for long incision, slow rib separation and the limitation of separation width to the size of a fist (see below).

Figure 8-4: Thoracotomy with Rib Retractor
Discussion Closure Steps
Closure of Postero-lateral Thoracotomy and Chest Tube Insertion
• Chest tube placement. Describe making skin incision through the Microfoam “skin” just above the rib and the use of a Kelly clamp to create a “path” for the chest tube into the pleural cavity.
• Demonstrate Kelly clamp placement of the chest tube between the ribs with the tip of the clamp 1 cm. beyond the end of the tube.
• Discuss anterior and posterior positioning of two chest tubes in the left thoracic cavity.
• Demonstrate securing of chest tube to chest wall with two 0-silk sutures.
• Demonstrate placement of circumferential “purse-string” 0-silk suture one cm. away from the base of the chest tube and then wrapping it untied after removing the needle around the base of the tube against the chest wall.
• Wrap a 10 cm length of the ¼ inch Vaseline gauze strip over the purse-string suture so that it will not adhere to the adhesive tape used to hold the tube to the chest wall.
• Apply a 20 cm length of 3-inch adhesive tape to the skin and chest tube to hold it in place. Repeat on the opposite side of the tube. Demonstrate the “elephant trunk” technique of creating three adjacent strips of the adhesive tape for 5 cm along one end of the tape so that the central strip can be wrapped around the chest tube and the two remaining outside strips can be secured to the skin beyond the chest tube.
• Demonstrate removal of the adhesive tape and underlying Vaseline gauze to expose the purse string suture when time comes for chest tube removal.
• Discuss the importance of removing the chest tube or tubes quickly with patient in maximum inspiration and manual compression of the tube sites to avoid pneumothorax.
• Demonstrate tying of the purse string suture at previous tube site.
• When closing the thoracotomy incision, discuss option of placing intercostal nerve blocks below each rib for post-op analgesia.
• Discuss importance of communicating with anesthesiologist/anesthetist about releasing the left and right arm fixation to the arm boards and then “unbreaking” (flattening) the OR table at this point in the operation.
• Demonstrate the use of rib approximator and placement of pericostal sutures above the 5th rib and below the 6th rib.
• Discuss reattachment of inferior fascial border of Serratus Anterior and re-approximating the cut ends of Latissimus Dorsi muscle with placement of sutures through the surrounding muscle fascia and not just muscle tissue itself. Discuss the importance of anesthesiologist/anesthetist pushing the patient’s shoulder caudally and posteriorly to assist Latissimus re-approximation.
• Optional. Discuss and demonstrate principles of water seal drainage and how to “read” the drainage system for 1) air leaks 2) fluid drainage 3) fluctuation of water seal column as a guide to adequate post-op pain control and 4) tests to assure adequate chest wall suction.